Are you new to the world of yoga? If you are, you should be aware that there are different yoga asanas that you would have to eventually master. You see, asanas are the different yoga poses, and you need to do them right to get the most out of your yoga journey. One such asana includes Utthita Parsvakonasana, which translates to English as the “Extended Side Angle Pose”. In this blog, we will teach you everything you need to know about Utthita Parsvakonasana, from its benefits to how to do it correctly.
So, buckle up and let’s get started, shall we?
Table Of Content
What is Utthita Parsvakonasana
Origins Of Utthita Parsvakonasana
How to do Utthita Parsvakonasana
What Is Utthita Parsvakonasana?
Utthita = Extended
Parsva = Side
Kona = Angle
Asana = Pose
The Extended Side Angle Pose, also commonly known as Utthita Parsvakonasana (Sanskrit: उत्थित पार्श्वकोणासन), is one of the many modern yoga asanas. This pose is quite beneficial for one’s physical health, and it also promotes mental well-being. Utthita Parsvakonasana is done in many yoga sequences, like Ashtanga yoga, Iyengar yoga and hip opening yoga sequences, to name a few.
While this pose may seem easy, it can be hard for some. It is often used as a warm-up pose before more advanced standing poses are performed. It also can be modified for different levels of experience.
You should probably avoid performing this asana if you have any injuries to the neck, arms, shoulders, legs or hips, basically the areas that can cause pain or discomfort while you hold the lunge position.
Origins Of Utthita Parsvakonasana
The origins of Utthita Parsvakonasana can be traced back to the ancient Indian text, the Hatha Yoga Pradipika, written by Swami Svatmarama in the 15th century. The text mentions a similar pose called Parshvottanasana, which involves stretching one leg out to the side while bending the other knee and placing the hands on the hips. Over time, the pose evolved and was modified to create Utthita Parsvakonasana.
In the 20th century, the famous yoga teacher, B.K.S Iyengar, popularised Utthita Parsvakonasana as a powerful pose that can help improve strength, flexibility, and balance. To make the pose easier for beginners, Iyengar constructed his own version of the pose.
Today, Utthita Parsvakonasana is a common pose practised in yoga classes all over the world. It is considered a foundational pose that helps stretch the hamstrings, groin, and hips while also strengthening the legs, arms, and core muscles.
Read more: Why Are Bodyweight Exercises Harder Than Weights
What Are The Benefits Of Utthita Parsvakonasana?
Some of the benefits of Extended Side Angle Pose are:
- Strengthening of the knees, ankles and legs.
- Toning of the pelvic floor as well as abdominal muscles.
- Stretching of the hamstrings, back and groin muscles.
- Improving balance.
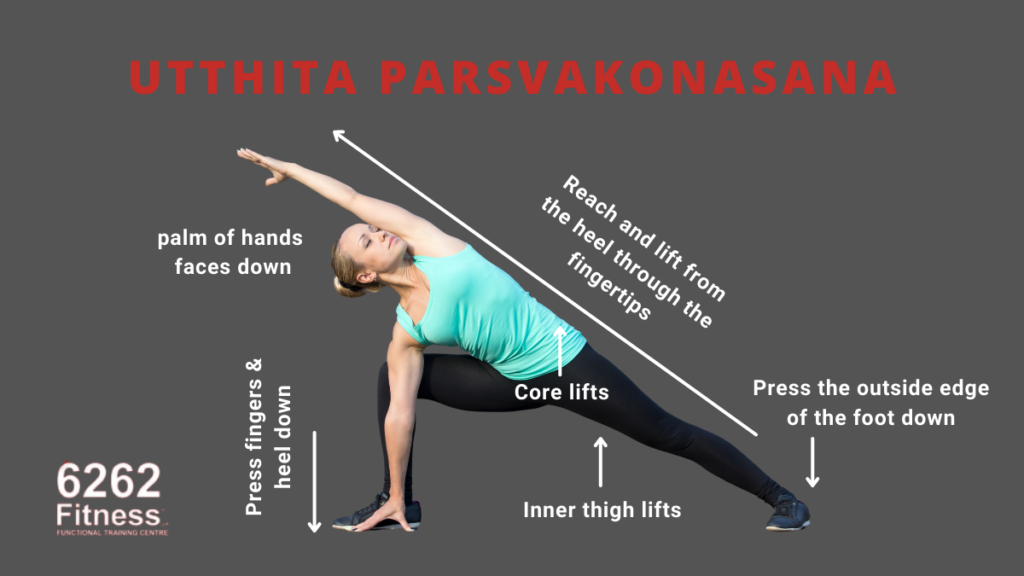
8 Steps To Master Utthita Parsvakonasana

To do an Extended Side Angle Pose correctly, follow these steps:
- Step onto your mat and do a Tadasana (Mountain Pose).
- The next step is to put your left foot back. Then, turn it out at a 90-degree angle so that your left heel is in line with the arch of your right foot. Make sure that your left foot is parallel to the back of your mat.
- Now, you need to inhale as you raise your arms, stretching them out to the sides with your palms facing downwards.
- Bend your right knee so that it is directly over your right ankle. As you do this, exhale. Make sure that your right thigh is parallel to the floor.
- Then, bring your right hand down to the ground on the inside of your right foot. If you can’t reach the floor, you can use a block or place your hand on your shin instead. Stretch your left arm straight up towards the ceiling.
- While you hold this position, take 5 to 10 deep breaths and focus on grounding down through your feet while maintaining a steady breath.
- When you’re ready to release the pose, inhale and press into your right foot as you lift your torso back up to standing. Put your left foot forward next to your right foot.
- You can repeat the pose on the opposite side.
Variations Of Utthita Parsvakonasana
Here are some variations of Extended Side Angle Pose you could try:
Bound Extended Side Angle Pose: This variation deepens the stretch in the chest, shoulders, and spine. To do this, just clasp your hands behind your back, draw your shoulders down as you fold forward, and your head towards the ground.
Revolved Extended Side Angle Pose: This variation is important for strengthening the obliques and improving spinal mobility. Here, you can begin with the traditional Extended Side Angle Pose. Then, you need to twist your torso and reach one arm up towards the ceiling. Make sure that your other hand remains on the ground.
Half-Bound Extended Side Angle Pose: With this variation, you will be able to stretch your chest, shoulder and spine. To do this, clasp your hands behind your back with only one hand. Your other arm should reach up towards the ceiling.
Side Angle Pose with Forearm Support: This will help you in strengthening your core and stretching your hips. To do this, rest your forearm on your thigh instead of bringing your hand to the ground.
Reverse Extended Side Angle Pose: This will help in creating a deep stretch in your chest, shoulders, and spine. To do this, remain in the Extended Side Angle Pose. Then, reach your top arm back towards your back leg.
We advise that before you try any of these variations by yourself, you talk to a qualified yoga teacher first to ensure that they are the best asanas for you.
Read more: Should I Skip Leg Day If My Knee Hurts?
Read more: Parsvottanasana (Intense Side Stretch Pose): Steps & Benefits
Common Mistakes To Avoid When Doing Utthita Parsvakonasana
To ensure that you do not make any mistakes, bear the following tips in mind:
- You should probably avoid performing this asana if you have any injuries to the neck, arms, shoulders, legs or hips, basically the areas that can cause pain or discomfort while you hold the lunge position.
- Ensure that your right knees are not past your foot, as it can apply unnecessary pressure on your knee.
- As you do the side bend, ensure that your pelvis is not locked. You should rotate your pelvis instead.
Wrapping Up!
Utthita Parsvakonasana is a useful pose for yogis of all levels. Whether you’re just starting out on your yoga journey or you’re already a yoga aficionado, this pose will definitely help you to build strength, increase your flexibility, and cultivate greater mindfulness and self-awareness. So the next time you’re on your mat, take a moment to explore the many benefits of this powerful and transformative pose.
If you are new to the world of yoga, we advise that you talk to a yoga instructor before you blindly try advanced poses by yourself. Join our online fitness class today.